“Walking Fish”
Evolve abstract art by evolving neural networks in Javascript. See gallery here. Try the web app and start evolving your own art pieces from scratch here!
This is my implementation of CPPN-NEAT (Stanley, GPEM-07) algorithm with some variations, with the help of karpathy‘s brilliant recurrent.js expression graphs library and cola.js for interactive visualisation of neural networks.
Recently I have been interested in image generation using neural networks, and have tried to generate art work by randomising the initial weights of a multi-layer feed forward network in a previous post. To extend that work I’ve also tried to use generative adversarial network techniques and tried to use back propagation to fine tune the weights of the generative net to score high in realism to cheat the discriminatory network trained to identify real world images from fake ones. This approach didn’t work so well, because the discriminatory network has a much easier job at hand (with the aid of a few convnet layers with dropout) and the generative network eventually took a long time to achieve mediocre scores and unimpressive pictures so I became stuck, and I branched out to read more about…
CPPN-NEAT
I have always been fascinated by Stanley’s work on his NEAT algorithm. NEAT is a method to gradually evolve complicated neural network topologies from the barebones simplest single layer network. The work done to use NEAT as a compositional pattern-producing network gives me an excuse to work on my NEAT implementation in Javascript and to reuse my CPPN code in the aforementioned failed experiment to generate images. Stanley has produced a version of CPPN-NEAT called picbreeder, a site that allows users to evolve images using this technique, but it was written in the heydays of Java applets before modern web technologies became popular. I didn’t really want to install a Java SVM on my computer, and I thought implementing CPPN-NEAT in Javascript in a modern looking web application could be a fun and educational exercise. I haven’t really actually used picbreeder to this day, so most of my work is from reading the original CPPN-NEAT paper.
CPPNs are used to generate patterns, or in this case images, by feeding input coordinate information into a blackbox function that will compute a real number output representing the intensity (ie, the grayscale value) of a pixel at the input coordinate. In our case, the blackbox function is a neural network. Below is a flow diagram of how this process works:
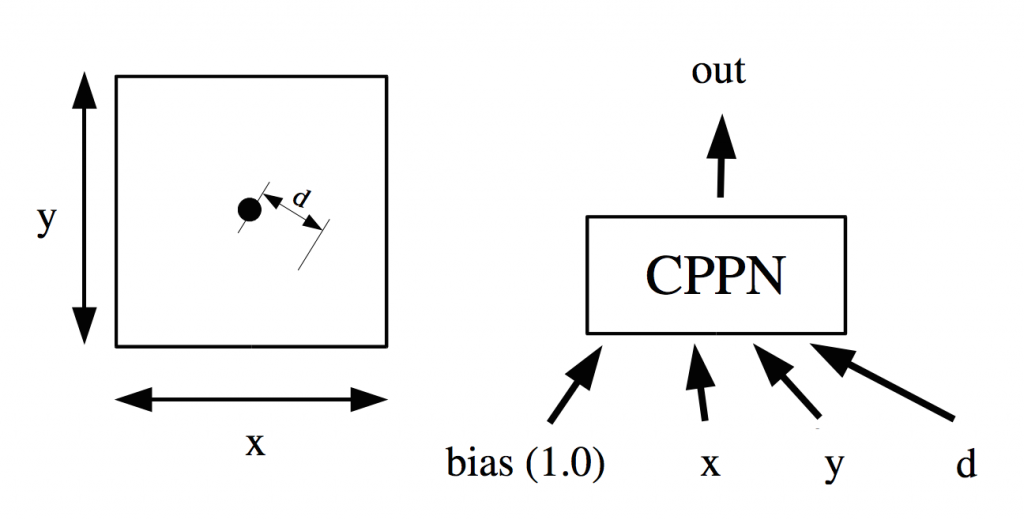
CPPN flow diagram (source: Stanley GPEM07)
At every pixel, we feed into the CPPN the (x, y) coordinate of that pixel, and to make things more interesting, feed in the distance of (x, y) from the origin, and also a bias input of 1.0 that is typical of neural nets. The effect of feeding the distance is a brilliant discovery in the CPPN-NEAT paper. I’m not sure if they discovered it, or if the original genetic art software designers discovered it, but I also consider it a smart cheat in a way, because it allows the network to generate circulate shapes easily that would make the image look naturally more interesting. The CPPN can be a very general neural network, and the output of that network will be made, via some manipulation to stay between [0, 1], to represent the pixel’s value at (x, y). In Stanley’s paper, he used a hyperbolic tangent function on the final output, and applied an absolute value to the tanh() output to achieve this. I will discuss alternatives later on in the post below.
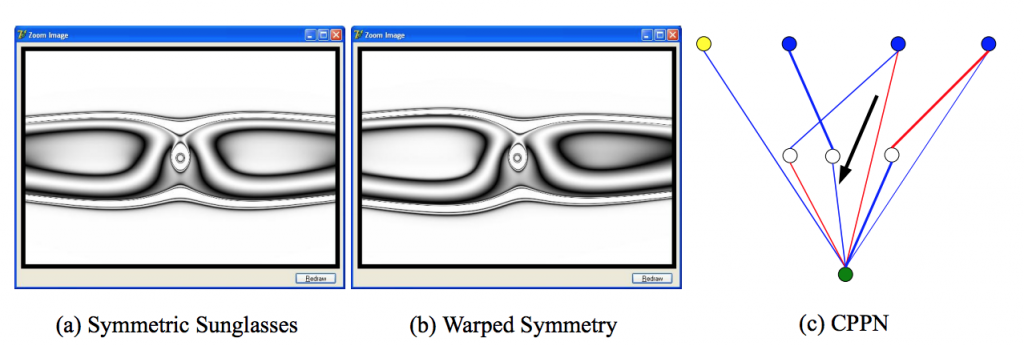
Example images produced in (Stanley, GPEM07) paper
In Stanley’s CPPN-NEAT paper, we see this example of a simple network with 3 hidden nodes that end up generating this eye-glass looking shape with some sense of imperfect geometry. The output of the network is a real value from [0, 1] which will determine each pixel’s intensity to construct a grey-scale image. Later on, colour pictures were produced by having the output become a vector of 3 colour channels. In my implementation I have also required the network to output 3 values for each pixel to represent Red, Green, and Blue channels to generate a full colour picture. In the next section I will describe the web app Neurogram and the implementation details.
Neurogram: Implementing CPPN-NEAT in a Javascript Webapp
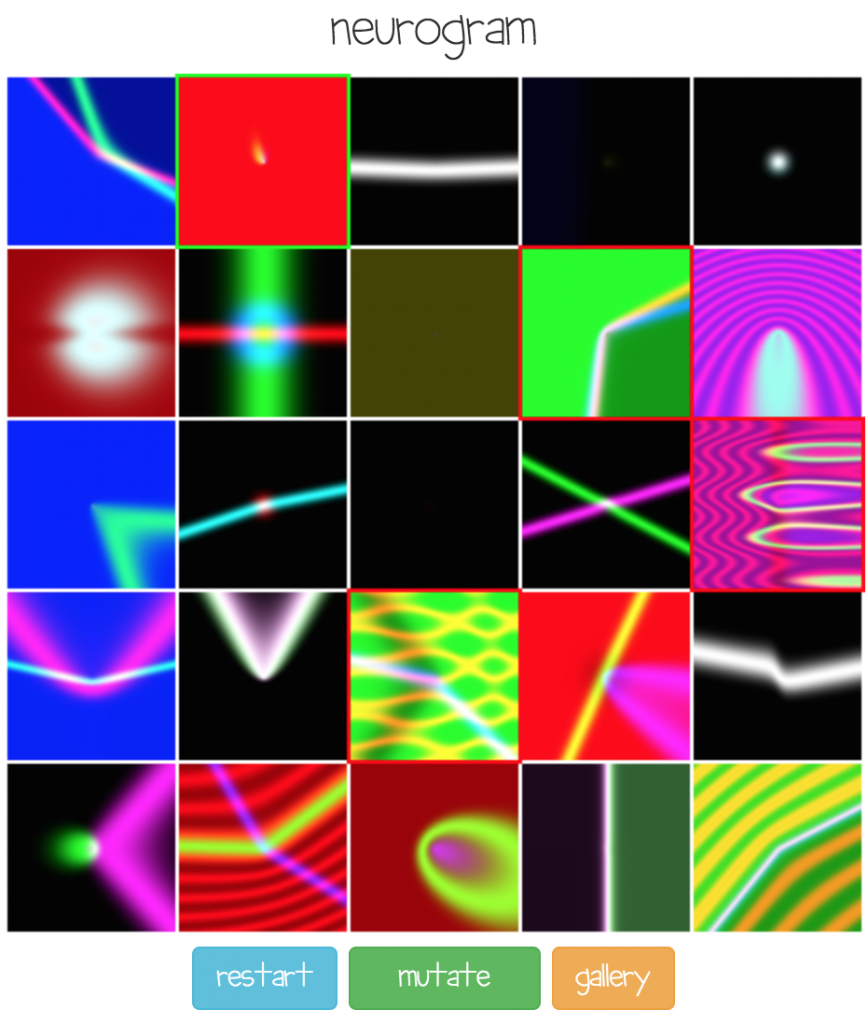
The user selects up to 4 images to be co-evolved by hitting the ‘mutate’ button.
At the beginning of the process, a batch of random networks of simple topologies are used to generate a bunch of random images, and users can select to keep a small subset of images to be used to generate a new set of images via a the genetic algorithm (NEAT). The above screen is the initial screen of Neurogram with fairly basic images generated by simple networks. After the user selects between 1 to 4 images and mutates them, the next set of networks will be gradually more sophisticated than the previous set, as more neurons and connections get added. This process continues until the user eventually really likes a certain image and double-clicks on that image to save or publish it, like the two images below:
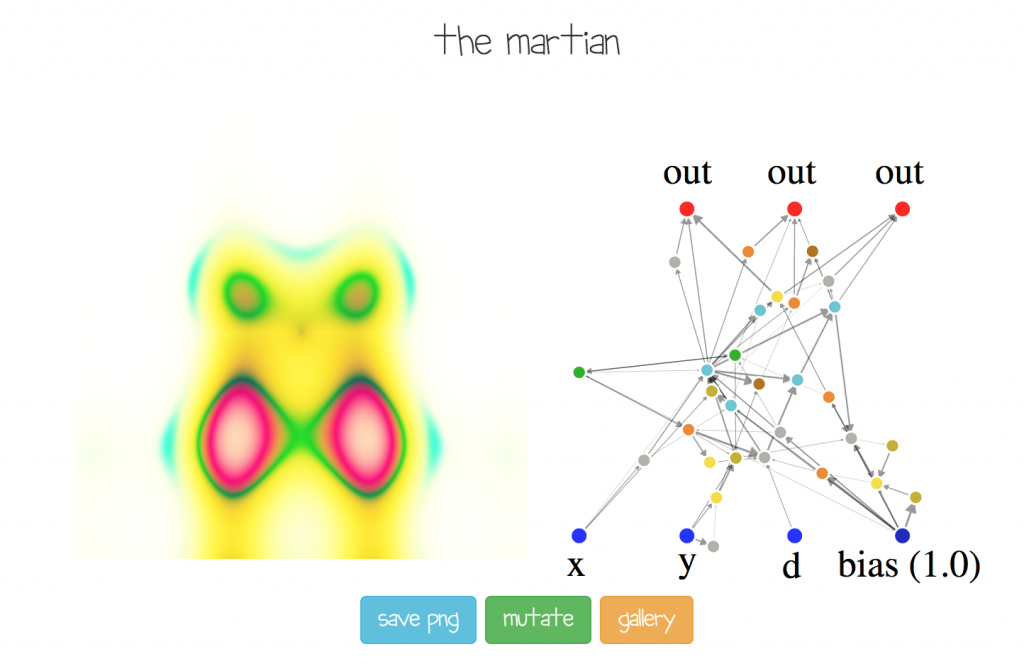
Here some weird alien creature was evolved! The user can type in a description of the final image and publish the genome to my server, and also save the image as a .png
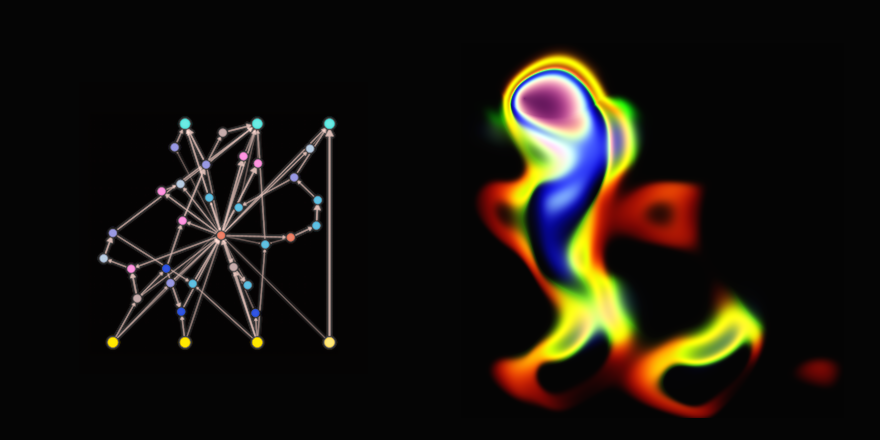
The (x, y, d, bias), and (out) labels added manually to illustrate only in the figure above what the network represents and how it is used. If the mouse is hovered over a neuron, a label pops up to describe which type of neuron it is (sigmoid, sine, cosine, gaussian, etc). Connections with large weight magnitudes will have a darker and thicker colour than light connections.
Neurogram allows the user to see a larger version of an image and also visualise the actual network generating the image.
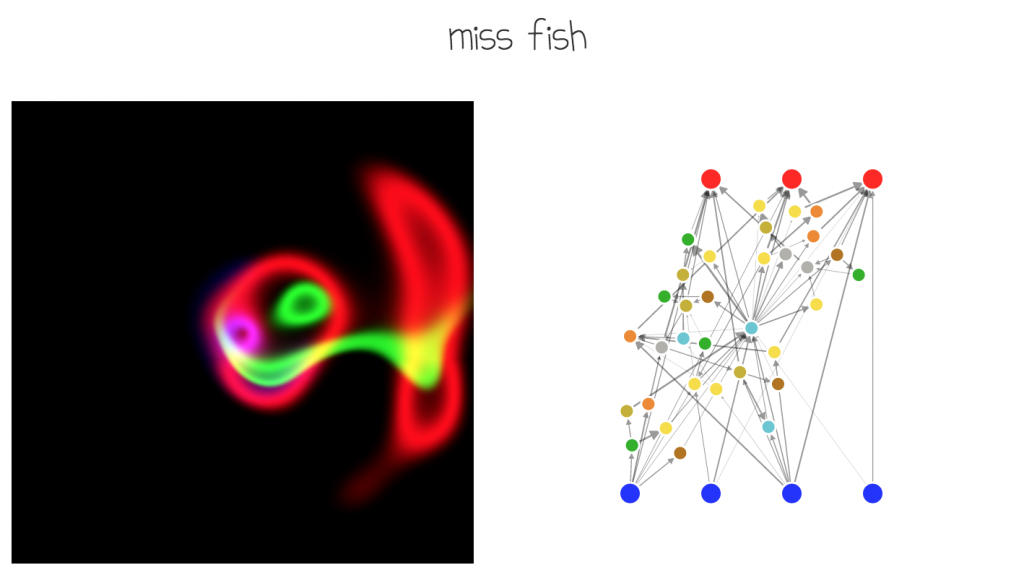
To construct more interesting features, the CPPN-NEAT paper used primarily the gaussian function as the activation function of each neuron, in addition to the sigmoid, and occasionally used sine and cosine functions to preprocess the inputs to allow for the generation of more visually appealing. What I have done is to extend the recurrent.js library to include sine, cosine, gaussian functions, and allow NEAT to randomly choose these functions, in addition to sigmoid, tanh, relu, square, multiplication, abs functions to generate a rich CPPN network that can hopefully generate cool pieces of abstract art. The image below is an example when NEAT randomly used sinusoidal functions primarily, along with other functions in the network.
As an aside, as mentioned earlier, by constructing the distance parameter in the input to the CPPN (the “cheat” :-), circular images like these batman logos can be easily generated by chance:
Tricks, Challenges and Implementation Issues
Although the basic CPPN-NEAT idea is simple, in reality there are an abundance of parameters and choices one has to make. Many different sets of parameter settings are available and if chosen well, the algorithm can be able to generate a wide range of interesting, and in my opinion, artistic images resembling abstract art. I have spent some time via trial and error to experiment with a wide range of settings, such as how to scale from pixel space to actual coordinate space, mutation rates, mutation sizes, size of shocks, and what types of neurons actually matter. The final implementation is chosen to suit a style that generates figures that match a sort of “graffiti” style I wanted, which is a bit different than the images that have been generated on picbreeder.
Generating coherent colour images
One of the issues that arise is how to increase the likelihood of generating plausible colour images. If networks are initially fully connected from input to output (ie, 12 initial connections, since 4 inputs including bias and 3 outputs), or if no connections are present initially and connections must develop themselves, we end up probably generating 3 greyscale images, and overlapping them on top of each other on the red, green, and blue plane. Using another set of basis, such as HSV or HSL may improve the situation but the results were still not satisfactory to me. What I end up doing was initialising the network with a single linear additive hidden neuron (not sigmoid), and have all the inputs connect to that initial neuron, and have that initial neuron connect to all three output channels, all with random initial weights. Using this approach, it is more likely that future addition of neurons and connections will keep a more coherent image as the three colour channels will likely be more interconnected. Below is an example of what I mean, as illustrated with a very simple network that draws something resembling a piano keyboard.
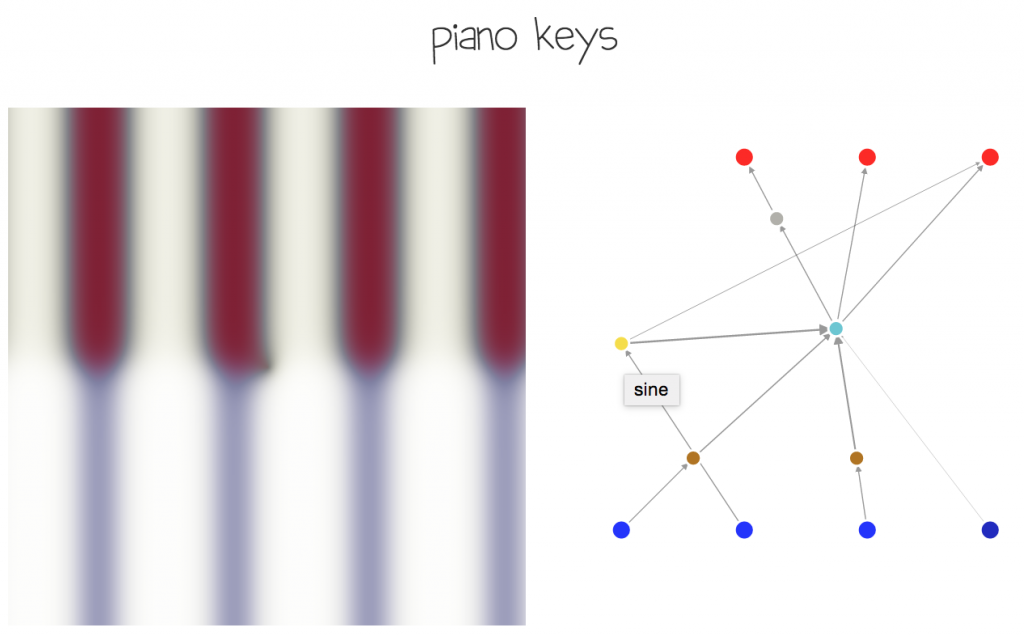
The sine neuron in yellow, had been randomly added in a latter generation separated from the initial additive neuron, to generate a repeating key pattern.
Network construction and propagation
I also decided to limit the types of hidden neurons, and kicked off the multiplication neuron (which is used in networks that want to have memory states such as LSTM), as what happened was that when we multiplied sinusoids together we just end up with another sinusoid with a higher frequency and that tends to cause most low frequency images to go away as we evolve more steps. I’ve also taken off the absolute operator since we already have relu’s.
In the CPPN-NEAT paper, I believe the author might have limited new connections so that the final network will not be recurrent to allow for a straight forward input-output propagation. For my network, I actually allowed all the hidden neuron to freely connect with another non-input neuron in the network, so it is actually quite likely we end up with recurrent networks. Thanks to the Graph object in recurrent.js, this was not so difficult to do. The trick was to choose how to forward prop the network since we can do it in many ways and still get a set of output values. I wrote another post about this topic when I was thinking about how to traverse the network and there really isn’t any correct answers. I decided to go for option (3) in my post as it was fairly easy to implement and generated good results. What is interesting is that in this framework, I would also be able to use efficient back propagation on a NEAT evolved network! It can lead to some very interesting work in the (near) future.
We also need to ensure that the final outputs of the network is between [0, 1] for each colour channel. What the CPPN-NEAT paper did, as I mentioned early was to pass the channel through a tanh() function and then another abs() function, so values close to zero in the output layer would correspond to a dark area, while values that are both positive and negative would correspond to a light or white area. This allowed the images to be more interesting and sophisticated in earlier stages of evolution, even 2-3 steps, as mentioned in the paper, and I was also able to see this effect.
However, I noticed that the sigmoid() filter on the output, rather than the paper’s approach, generated images that tend to have more natural colours, but interesting images appeared with a few more generations of evolution. In addition, even using a gaussian() filter on the output generated neon-like pictures with dark images that looked cool. It was really difficult for me to determine which filter was best since all three generated its own unique style of art, so I ended up allowing all three filters and chose them at random for each image, with a higher probability for the sigmoid filter.
Web app implementation issues
I settled on using bootstrap and jQuery to develop the interface for the web app since it is a fairly small footprint. If it was a lot more complicated then I would probably used some framework (but I’m not really a fan of those since it feels like actually “working”). As not much interaction is needed, and this is not a game or a physics simulation, I didn’t use p5.js like in the other projects and just used plain old canvas since it’s fast, and I can also use canvas for node.js without a browser. The challenge with the whole responsive web app development is that while it may work well for auto-resizing images, but canvas is stuck with the same size, so there was quite a bit of hacks required on my end to choose a different set of image sizes depending on whether a mobile device was used or a desktop was used. I also took advantage of the canvas.scale() functionality to create bigger images on mobile devices that were too slow. Also for this exercise I feel I really learned how the Image object works in the web browser and know the guts of how it stores and manipulate pixel data efficiently.
There are also memory issues when our networks get too big. What I did was rather than feed individual (x, y, d, bias) into the network as individual values to generate one pixel at a time, I created whole vectors X, Y, D, Bias that contained every input for the entire image, to feed into the recurrent.js graph machine, and get the entire output image in one forward pass. This was generally much more efficient as we don’t need to go through the graph object creation step for each pixel, and for a 320x320x3 image, there can be quite a bit of pixels. For each neuron, it would create another layer of 320x320x3 weight and weight derivative values, so for a large network this will blow up the computer’s memory. In the near future I may fix it by splitting the propagation for each line of the image, so for now if we are using this web app on an iPhone, or a machine without a lot of RAM, it may experience hiccups after 20-30 generations of evolution. Don’t say you were not warned.
[Update 08/03: Memory issue resolved.]
Future Work
- A Backpropable version of NEAT might be very interesting as now I have a framework for evolving a random network, and the machinery using recurrent.js to perform back propagation through time to adjust the weights efficiently to optimise locally.
- Novelty art creation using adversarial generative type frameworks can be explored. My previous experiment of just using a feed forward network wasn’t able to keep up with the big-and-bad tough guy “bouncer” discriminatory network trained to identify natural, real-life images versus fake images, but this approach might! Also, I can re-train the discriminatory network every time so that for each iteration, CPPN-NEAT will have to generate images that do not look like images it has generated in the past, leading to novelty-like automatic art discovery. My goal is not to use this method to generate life-like images actually, but I want to see what images can get generated in this constrained type of networks, for the artistic value.
- Combining the previous two approaches may lead to more efficient generation of novel art pieces. We may also be able to test Lamarckian versus Darwinian evolution of art!
- Longer term, evolve grow small sized ‘core’ recurrent network layers that get repeated over and over again in a large deep network, that are fully differentiable. In other words, apply NEAT to discover sub networks that can work in a backprop environment for other machine learning tasks. See if we can discover the next LSTM via evolution with all these extra differentiable gate types!
Please give the neurogram web app a try and let me know any feedback. I have also uploaded the code to github.